준비 과정
1. CRA
npx create-react-app tistory(파일명)
2. npm start
Express 설치
1. Express설치
npm install express --save--save는 안붙혀도 된다. --save의 뜻은 종속 항목 목록에 저장한다는 뜻이다.
--save를 안붙히면 프로젝트를 git clone하여서 다운받았을때에 npm install express를 해줘야하지만
--save를 붙힌 것들이 npm install 만 치면 알아서 설치가 된다.
2. server.js 만들기
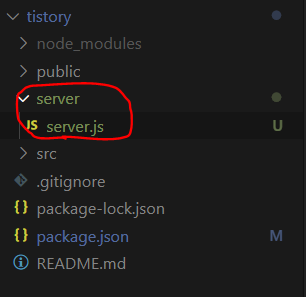
server파일과 server.js를 만들어준다.
const express = require('express')
const app = express()
const port = 3001 // react의 기본값은 3000이니까 3000이 아닌 아무 수

app.get('/', (req, res) =>{
    res.send('혁이는 코딩 중!')
})

app.listen(port, ()=>{
    console.log(`Connect at http://localhost:${port}`); // '가 아닌 좌측상단의 esc버튼 밑의 `다.
})
nodejs로 작성된 파일이기 때문에 node 파일명.확장자 즉
node server.js 를 입력하여 실행해준다.

그러면 잘 연결됐다고 Connect at ~ 이 뜬다.
그리고 localhoshttp://localhost:3001/으로 들어가보면

요로코롬 뜬다 !
3. React에서 server로 데이터 전송해보기
전송하기 전에
App.js 를
import React, { Component } from 'react'
import './App.css';
export default class App extends Component {
  state = {
    id : "",
  }

  handleChange =(e)=>{
    this.setState({
      [e.target.name] : e.target.value,
    });
  }

  render() {
    return (
      <div>
        <input onChange={this.handleChange} name ="id"/>
        <button>Submit</button>
        <h1>{this.state.id}</h1>
      </div>
    )
  }
}
요렇게 만든다.
그러면
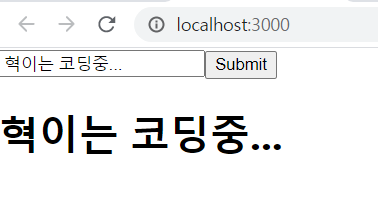
인풋창에 입력을 하면 밑에 나온다.
나는 이제 submit을 누르면 server의 log창에 뜨게 해보려고한다.
그러려면 server에서 cors와 body-parser를 설치해줘야 한다.
npm install cors --save

npm install body-parser --save
그 후에 server.js를
const express = require("express");
const app = express();
const port = 3001; // react의 기본값은 3000이니까 3000이 아닌 아무 수
const cors = require("cors");
const bodyParser = require("body-parser");

app.use(bodyParser.urlencoded({ extended: true }));
app.use(bodyParser.json());
app.use(cors());

app.get('/', (req, res) =>{
    res.send('혁이는 코딩 중!')
})

app.post("/idplz", (req,res)=>{
    const serverid = req.body.plzid;
    console.log(serverid);
});

app.listen(port, ()=>{
    console.log(`Connect at http://localhost:${port}`);
})
이렇게 고쳐준다.
const나 app.use는 cors와 body-parser를 사용하기 위해 추가해주는 공식같은 거다.
app.통신방법("/통신할 주소", (req, res)....
이런식으로 쓴다. 통신 방법에는 post get 등이 있다.
req는 앞에서 보낸 객체를 받아 body가 앞에서 보낸 데이터다.
res는 express에서 데이터를 보낼때에 사용한다.
server.js를 수정했으면 서버를 다시켜줘야한다! 리액트처럼 새로고침한다고 바로 바로 수정이 되지않는다 !
그러면 이제 다시 app.js를 고쳐보자
import React, { Component } from 'react'
import './App.css';
export default class App extends Component {
  state = {
    id : "",
  }

  handleChange =(e)=>{
    this.setState({
      [e.target.name] : e.target.value,
    });
  }

  submitId = ()=>{
    const post ={
      plzid : this.state.id,
    };

    fetch("http://localhost:3001/idplz", {
      method : "post", // 통신방법
      headers : {
        "content-type" : "application/json",
      },
      body : JSON.stringify(post),
    });
  };

  render() {
    return (
      <div>
        <input onChange={this.handleChange} name ="id"/>
        <button onClick = {this.submitId}>Submit</button>
        <h1>{this.state.id}</h1>
      </div>
    )
  }
}
submitId 함수안에 fetch함수를 작성하여 server에 보낼 준비한다.
fetch는 url주소는 우리가 데이터를 보낼 주소다.
Express는 3001번 포트를 사용하였기 때문에 localhost:3001로 적어준다.
method : 보내는 방법에 get post delete 등이 있다.
headers : API 응답에 대한 정보를 담는다.
body : 전달할 내용, 통신할때는 객체로 통신하기에 객체 타입으로 작성해야 한다.
결과

오늘도 열코 ~!~!
참고자료
wonyoung2257.tistory.com/5?category=805961
React 와 Express 연동하기 1 (React에서 Express로 데이터 보내기)
React와 Express를 연동하는 방법을 해보겠습니다. 1. 준비과정 create-react-app 앱이름 으로 앱을 만들고 npm start 하여 앱을 실행시켜줍니다. react로 앱을 처음 만들고 실행한 상태로 진행합니다. 2. Expres
wonyoung2257.tistory.com
guswnsxodlf.github.io/enable-CORS-on-express
node.js express에서 CORS 허용하기
CORS란 무엇인가CORS란 Cross Origin Resource Sharing의 약자로, 현재 도메인과 다른 도메인으로 리소스가 요청될 경우를 말한다. 예를 들어, 도메인 http://A.com 에서 읽어온 HTML페이지에서 다른 도메인 http:
guswnsxodlf.github.io
'React' 카테고리의 다른 글
| React - Mysql 연동하기, 연결(데이터 저장) (0) | 2020.10.17 |
|---|---|
| React와 Express연동하기 2 (0) | 2020.10.15 |
| React - SPA(Single Page Application)만들어보기 - 4. Modal창 만들기 (0) | 2020.10.15 |
| React - SPA(Single Page Application)만들어보기 -3. 파비콘 및 타이틀바꾸기 (0) | 2020.10.11 |
| React - SPA(Single Page Application)만들어보기 -2. 각 컴포넌트 (0) | 2020.10.11 |


